What to Know Before Installing Retrofit Windows
Thinking about new windows for your place? It’s a big job, and honestly, it can feel a bit overwhelming. You want them to look good, work well, and not cost a fortune. This guide breaks down what you need to know before you start, covering everything from what a retrofit window actually is to how to pick the right person for the job. We’ll help you get ready for the window replacement process so it goes as smoothly as possible.
Key Takeaways
- Retrofit windows fit into your existing window frame, making the replacement process simpler than a full-frame swap.
- Prepare your home by clearing space around windows, covering furniture, and making a plan for kids and pets.
- Gather necessary tools like a putty knife, level, screws, caulk, and insulation, plus protective gear.
- Understand the installation steps: removing old panes, fitting the new window, and sealing for efficiency.
- When hiring professionals, ask about their experience, warranties, and clarify expectations about potential minor damage.
Understanding Retrofit Window Installation
When you’re thinking about new windows for your home, you’ll likely hear the term “retrofit window” quite a bit. So, what exactly is a retrofit window, and how does it differ from other replacement methods? Understanding this is key to knowing what to expect during installation.
What is a Retrofit Window?
A retrofit window, also known as a “replacement” or “insert” window, is designed to fit directly into your existing window frame. This means the old window sash and sometimes the entire frame are left in place. The new window unit is essentially inserted into the old opening, creating a snug fit. This method is generally less invasive than a full-frame replacement.
Pocket Replacement vs. Full-Frame Replacement
It’s important to know the difference between these two common replacement types:
- Pocket Replacement: This is what a retrofit window installation typically involves. The old window sash is removed, but the original window frame stays put. The new window unit is then installed within this existing frame, often called a “pocket.” This is usually quicker and less disruptive.
- Full-Frame Replacement: This method involves completely removing the old window, including the entire frame, down to the rough opening. A brand-new window unit, complete with its own frame, is then installed. This allows for more flexibility in window style and size and is often recommended if the original frames are damaged or rotten.
Benefits of Retrofit Window Installation
There are several good reasons why homeowners opt for retrofit windows:
- Cost-Effective: Generally, pocket replacements are less expensive than full-frame replacements because they require less labor and fewer materials.
- Less Disruptive: Since the existing frame isn’t removed, there’s typically less damage to interior and exterior finishes like drywall, plaster, and siding. This often means less cleanup and fewer touch-ups needed afterward.
- Faster Installation: The process is usually quicker, which means less time with your home in a state of construction.
- Preserves Original Details: If your home has beautiful, original interior trim or moldings around the windows, a pocket replacement can often preserve these details, which might be damaged or lost during a full-frame replacement.
While retrofit windows offer many advantages, it’s still a good idea to discuss potential minor cosmetic impacts with your installer. Sometimes, even with careful work, there can be small areas that need touching up around the new window.
Choosing the right type of replacement window and understanding the installation process will help set realistic expectations for your home improvement project.
Preparing Your Home for Window Replacement
Getting your home ready for new windows might seem like a lot, but it really helps the installation go smoother. Think of it like prepping your kitchen before a big cooking project – you want everything in its place so you can focus on the task at hand.
Clearing Space Around Windows
First things first, you’ll want to clear out the area around your windows, both inside and out. This means moving any furniture, plants, or decor that might be in the way. If you have curtains or blinds, it’s best to take them down too. This gives the installers plenty of room to work and prevents anything from getting damaged. For outside access, make sure any bushes, garden gnomes, or patio furniture are moved back a few feet. It’s a good idea to trim back any overgrown shrubs that might be right up against the window frame.
Protecting Furnishings and Valuables
Even with careful installers, there’s always a chance of dust or small debris getting into the room. To keep your furniture, floors, and anything else you value safe, it’s smart to cover them up. Use old sheets, drop cloths, or plastic sheeting. Pay special attention to anything directly below the window, as that’s where most of the action will be. You might even consider moving smaller, more delicate items to a different room entirely for the day. This is a good time to think about protecting your belongings, especially if you’re looking at window replacement options.
Managing Children and Pets During Installation
Installation day can be a bit chaotic, with people coming and going and tools being used. For the safety and comfort of your little ones and furry friends, it’s best to keep them out of the work area. Designate a safe space for them, perhaps a room far from the windows being replaced, or even arrange for them to stay with a friend or family member for the day. This not only keeps them safe but also allows the installation crew to work without interruption. It’s a small step that makes a big difference in keeping everyone calm and the project on schedule.
Essential Tools and Materials for Installation
Getting ready for window installation means having the right stuff on hand. It’s not just about the windows themselves; it’s about the bits and pieces that make them fit right and work well. Having everything organized beforehand really cuts down on headaches later.
Gathering Necessary Tools
When the installers show up, you want them to have what they need. But what if you’re doing some of the prep yourself, or just want to know what’s involved? You’ll likely see a few common tools:
- Putty knife: Good for scraping away old gunk or sealant.
- Level: Super important to make sure the new window isn’t crooked.
- Screwdriver and screws: For securing the new window unit.
- Hammer or mallet: Sometimes needed for gentle persuasion.
- Measuring tape: Always handy for double-checking.
Selecting the Right Materials
Beyond the tools, there are materials that seal the deal, literally. These help keep drafts out and your home comfortable.
- Window caulk: This is your go-to for sealing gaps around the exterior and interior.
- Foam insulation: Sprayed or rolled into the space between the old frame and the new window, it fills voids and stops air leaks.
- Wooden shims: These little wedges are used to make sure the window is perfectly plumb and level before it’s permanently fixed.
- Wood trim: Sometimes needed to finish off the interior or exterior edges for a clean look.
Importance of Protective Gear
This might seem obvious, but it’s worth mentioning. Installation can involve dust, sharp edges, and general mess.
Installers should always wear gloves and eye protection. If you’re helping out, don’t skip this step. It’s better to be safe than sorry when you’re dealing with glass and old building materials.
Having these items ready makes the whole process smoother, whether you’re the one holding the tools or just making sure the pros have what they need.
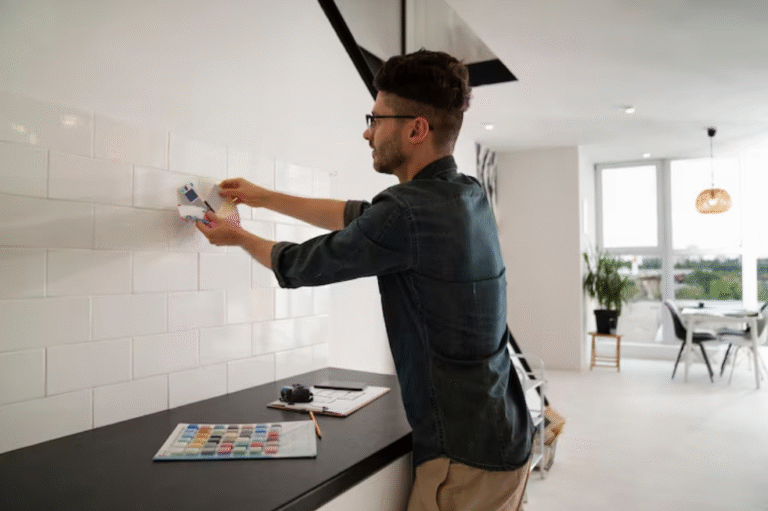
The Step-by-Step Retrofit Window Installation Process
So, you’ve decided on retrofit windows – that’s great! They’re a smart way to upgrade your home without a total overhaul. But what actually happens on installation day? It’s not just about slapping a new window in place. There’s a bit of prep and a specific order of operations to get it right. Getting this process down helps manage expectations and ensures a good result.
Removing Old Panes and Preparing the Frame
First things first, safety. Put on some gloves to protect your hands from any stray glass shards. The old window panes need to come out. Once they’re gone, you’ll likely find some old caulk or sealant around the frame. A putty knife is your best friend here for scraping that stuff away. After you’ve cleared out the old gunk, give the frame a good clean. Warm water, a bit of mild soap, and a rag or sponge usually do the trick. Let it dry completely before moving on. You want a clean, dry surface for the new window to sit in.
Fitting and Securing the New Window
Now for the new window. Carefully place your retrofit window into the prepared frame opening. It should fit snugly. Use a level to make sure it’s sitting straight and true. If it’s a little off, don’t worry. You can use wooden shims and a hammer or mallet to make minor adjustments until it’s perfectly level. Once it’s positioned just right, it’s time to secure it. You’ll typically screw the new window into the existing frame. Make sure these screws go in firmly.
Sealing and Insulating for Efficiency
This is where you really lock in that energy efficiency. From the inside, you’ll want to fill any gaps around the new window frame with foam insulation. This stops drafts and helps keep your home’s temperature steady. After that, you might add some wood trim around the inside edge. If you’re painting or staining that trim, it’s best to do it before you install it. On the outside, run a bead of window caulk around the edge where the new window frame meets your home’s siding. This creates a weather-tight seal. Finally, cover the screw heads on the inside with a bit more caulk to seal them up too. It’s these little details that make a big difference in how well your new windows perform.
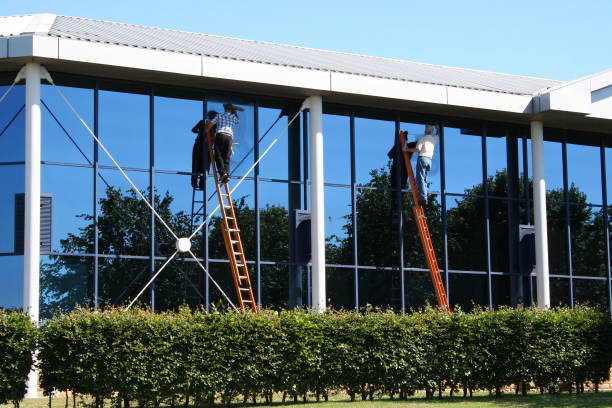
Choosing the Right Window Replacement Professionals
Options for Hiring Installers
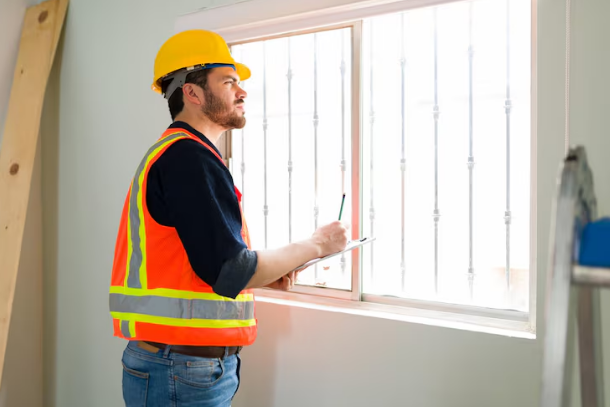
When it comes to getting new windows installed, you’ve got a few paths you can take. You could go with installers recommended by a big home improvement store. Just make sure to ask them about their experience and if they get a lot of repeat business – that’s usually a good sign they do solid work. Some stores might even offer warranties on the installation itself, which is definitely worth looking into. Then there are independent contractors, who can be great if you find a reliable one. You might also consider doing it yourself if you’re handy, but honestly, replacing windows is a pretty involved job. It’s really important to research all the steps and have the right tools before you even think about starting. If you’re not totally confident, it’s probably best to leave it to the pros. For accurate retrofit window measurements, it is best to rely on the expertise of window professionals. They will take precise measurements of the existing window openings to ensure a perfect fit for your new windows.
Questions to Ask Potential Contractors
Before you commit to anyone, have a good chat with potential installers. You’ll want to know how long they’ve been in business and if they have references you can check. Ask about their experience with the specific type of windows you’re getting and if they’ve worked on homes similar to yours. It’s also smart to ask about their insurance and licensing – you want to make sure they’re covered. Don’t be shy about asking for a detailed breakdown of the costs, including labor and materials. Understanding exactly what you’re paying for is key.
Understanding Installation Warranties
Most reputable installers will offer some kind of warranty on their work. This is super important because it protects you if something goes wrong down the line. Make sure you understand what the warranty covers, how long it lasts, and what you need to do to keep it valid. Some warranties might cover labor only, while others might cover both labor and materials. It’s also good to know if the warranty is transferable if you ever decide to sell your home. A solid warranty gives you peace of mind that the job was done right.
Managing Expectations During Window Replacement
Potential for Incidental Damage
Look, getting new windows installed is exciting, but it’s not always a perfectly clean process. The crew will do their best to protect your stuff, using drop cloths and such, but there’s always a chance for some dust or minor scuffs. Think about old houses – they’ve got layers of dirt and grime that can get stirred up. Even with good vacuums, you might find yourself doing a bit of extra cleaning afterward. It’s just part of working with older homes and materials. It’s wise to have a chat with your installer beforehand about how they handle dust and debris.
Discussing Preservation of Interior Moldings
This is a big one, especially if you have beautiful, original trim around your windows. When they do a retrofit installation, they’re essentially fitting a new window into the existing opening. This can sometimes mean disturbing or even slightly damaging the interior moldings if not done with extreme care. If keeping those moldings pristine is a top priority, make sure this is crystal clear with the installation team. You might even want to discuss if they have specific techniques or if a different installation method (like full-frame replacement, though that’s a different topic) would be better for preserving them. It’s about making sure your definition of “preserved” matches theirs.
Communicating Your Vision with Installers
Honestly, the best way to avoid surprises is to talk. Talk about what you want, what you expect, and what you’re worried about. Do you have specific ideas about how the new windows should look from the inside? Are there any areas you’re particularly concerned about? Lay it all out. A good installer wants you to be happy, and they can’t read your mind. Having a clear conversation upfront about your vision, your concerns, and what you consider a successful job can make the whole process much smoother for everyone involved. It helps set expectations on both sides, so there are fewer misunderstandings down the road.
Enhancing Your Home with New Windows
Getting new windows isn’t just about replacing old, drafty panes; it’s a chance to really update your home’s look and feel. Think of it as a home makeover, but focused on your views and natural light. You can go with something similar to what you had, or you can really shake things up. It’s a good time to consider what you want your home to look and feel like, both inside and out.
Matching Window Styles to Architecture
Your home has a certain style, right? Whether it’s a classic Colonial, a cozy Craftsman, or something modern, the windows you pick can either blend in or stand out. Looking up your home’s architectural style online and checking out pictures on sites like Pinterest can give you ideas. You’ll see what kinds of windows typically look good with that style. It’s not just about the outside, either. The windows affect how much light comes in and how your rooms feel, so think about how they’ll look from the inside too.
Considering Energy Efficiency Features
This is a big one. Newer windows are way better at keeping your home comfortable and saving you money on heating and cooling bills. You’ll want to look at things like the U-factor, which tells you how well the window insulates, and the Solar Heat Gain Coefficient, which is about how much heat from the sun gets through. For colder areas, a low U-factor is good. Some windows even have special gas fills between the panes to stop heat from escaping. Look for the ENERGY STAR label; those windows are certified to be efficient and can really cut down your energy use.
Exploring Creative Window Design Options
Don’t feel like you have to stick with the exact same window style you had before. Maybe that old picture window could be replaced with a bigger, floor-to-ceiling one for a more dramatic look. Or perhaps you could swap out a sliding window for a bay or bow window, which can even add a little seating nook. For those hard-to-reach spots, an awning window that opens with a crank might be more practical than a double-hung one. Think about what would make your home more functional and attractive. You might also want to consider things like noise reduction if you live on a busy street, or special hardware for a unique touch. And don’t forget about the glass itself – maybe shatterproof glass for a play area or textured glass for privacy in a bathroom.
Wrapping Up Your Retrofit Window Project
So, you’re thinking about retrofit windows. It’s a solid choice for updating your home’s look and feel without a massive overhaul. Just remember, while they fit into your existing frames, the job still needs care. Think about what style fits your house best, how much upkeep you’re up for, and definitely look into energy-saving options. Proper installation is key, so whether you DIY or hire someone, make sure it’s done right. A little planning goes a long way to making sure your new windows are a great addition to your home for years to come.
Frequently Asked Questions
What exactly are retrofit windows?
Retrofit windows, also known as insert windows, are designed to fit directly into your existing window frame. This means you don’t have to remove the whole frame, making the installation process simpler and often quicker.
What’s the difference between pocket replacement and full-frame replacement?
Pocket replacement is the standard for retrofit windows, where the new window unit slides into the old frame. Full-frame replacement involves removing the entire old window, including the frame, and installing a new one. Pocket replacement is usually less disruptive and faster.
How should I get my home ready for window installation?
Before installation day, clear about 5 feet of space around your windows, both inside and outside. Move furniture, take down curtains and blinds, and protect your belongings with drop cloths. Also, make a plan for kids and pets to keep them safe and out of the way.
What tools and materials are needed for installing retrofit windows?
You’ll need basic tools like gloves, a putty knife, a level, a screwdriver, screws, caulk, and possibly a hammer and shims. Foam insulation and wood trim are also used for sealing and finishing.
What kind of damage might happen during installation?
It’s wise to discuss potential minor damage with your contractor beforehand, like to interior trim or surrounding paint. Knowing this upfront can help manage expectations and prevent surprises, even though the end result is usually great.
How do I choose the best new windows for my home?
Consider your home’s architectural style to choose windows that look good. Think about how much maintenance you’re willing to do (vinyl and fiberglass are low-maintenance) and look for energy-efficient features like double-paned glass and good insulation to save on energy bills.